Common CATIA V5 Shortcuts & Customization

- Swapnil Deshmukh
- September 30, 2020
For any CAD software, Model manipulation options are very important to improve the productivity & for ease of use. This article will introduce you to all these options below.
Model Manipulation with Mouse
| Function | Options using your Mouse |
| Pan | Hold Middle Mouse B |
| Zoom | Hold Middle Mouse B + Click Right B or
Hold Middle Mouse B + Click Left B |
| Rotate | Hold Middle Mouse B + Hold Right B or
Hold Middle Mouse B + Hold Left B |
Model Manipulation with Keyboard
| Function | Option using your Keyboard |
| Pan | CTRL + RIGHT Arrow Key: Move the model to the right
CTRL + LEFT Arrow Key: Move the model to the Left CTRL + TOP Arrow Key: Move the model to the Top CTRL + BOTTOM Arrow Key: Move the model to the Bottom |
| Zoom | CTRL + PAGE UP: ZOOM IN the model
CTRL + PAGE DOWN: ZOOM OUT the model |
| Rotate | SHIFT + LEFT Arrow Key: rotate to the left
SHIFT + RIGHT Arrow Key: rotate to the right SHIFT + UP Arrow Key: rotate upward SHIFT + DOWN Arrow Key: rotate downward |
Listed below are the CATIA V5 shortcut keys that users need to know.
Esc: Abort the current process or exit the current dialog box (when there is one)
- F1: Get CATIA V5 assistance by launching the contextual help documentation
- F3: Toggle specification tree display on and off
- SHIFT – F1: Context assistance (Get help on toolbar icons)
- SHIFT – F2: Toggle the specification tree overview on and off – opens an overview on specifications tree in a new window.
- SHIFT – F3: Structure tree activate around e.g. character size to modify (activate the graph if the model is active and inversely)
- ALT + F8: Macros start
- ALT + F11: Visual basic editor
- CTRL + SHIFT + Right arrow: ROTATE the model Clockwise
- CTRL + SHIFT + LEFT arrow: ROTATE the model Anti Clockwise
- CTRL + Tab: switch between the different windows (swap active document windows)
- CTRL + N: New document open
- CTRL + O: Document open
- CTRL + S: Document save
- CTRL + P: Document print
- CTRL + F: Search
- CTRL + U: Update
- CTRL + X: Cut out
- CTRL + V: Insert
- CTRL + Y: Redo
- CTRL + Z: Undo
- CTRL + G: Selection Sets
- ALT + Enter: Properties
Did you know that you can improve your CATIA speed and efficiency by using both hands? One hand can work the mouse while the other can use keyboard shortcuts.
Customize the Commands
You can also create your own shortcuts for the frequently required commands by customizing them.
Tools>Customize
Select the Command Tab. Select the appropriate Categories and select the command (Hide/Show) which you want to create short key.
Click Show Properties button. Type the key which you want to use as shortcut key. In this example space bar key is used in the Accelerator field.
Now whenever you will press Space Bar key it will allow you to Hide/Show the selected elements.
Power input mode
The power input box is located in the bottom right corner of the status bar:
Power input mode is a user-friendly productivity assistant allowing you to:
- Enter numeric data more easily in editable fields and spinners (but cannot be used in combo lists); as such, it is intended as an alternative to typing values in dialog boxes (dialog boxes are however still available).
- Enter commands directly (by typing the c: followed by the name of the command).
- Entering selection queries using the query language available when using Edit > Search.
Power input is available in certain (but not all) application commands. Note also that prefixes used to run commands or selection queries vary according to the language.
To activate power input mode, select Tools > Options, click the General tab, and click the P2 option, then restart your session.
Activate Action Pad
This task explains how to set up pad options in order to perform viewing operations using the Tablet Pen on a Tablet PC. Note that you can use the pad to visualize both 2D and 3D objects
Tools>Options>General>Devices & Virtual Reality
If this option is selected, it means that the pad display is activated in the geometry area. By default, the pad is displayed to the right.
Recent Posts
-
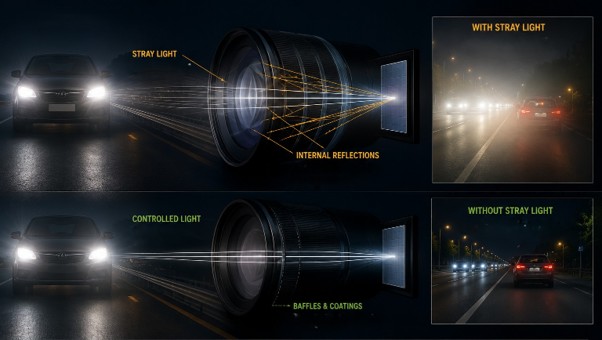
Identify Stray Light in Imaging Systems with LightTools
Stray light is undesired light radiation that interacts with the components of a system and degrades its performance by generating noise, that significantly reduces image…
-
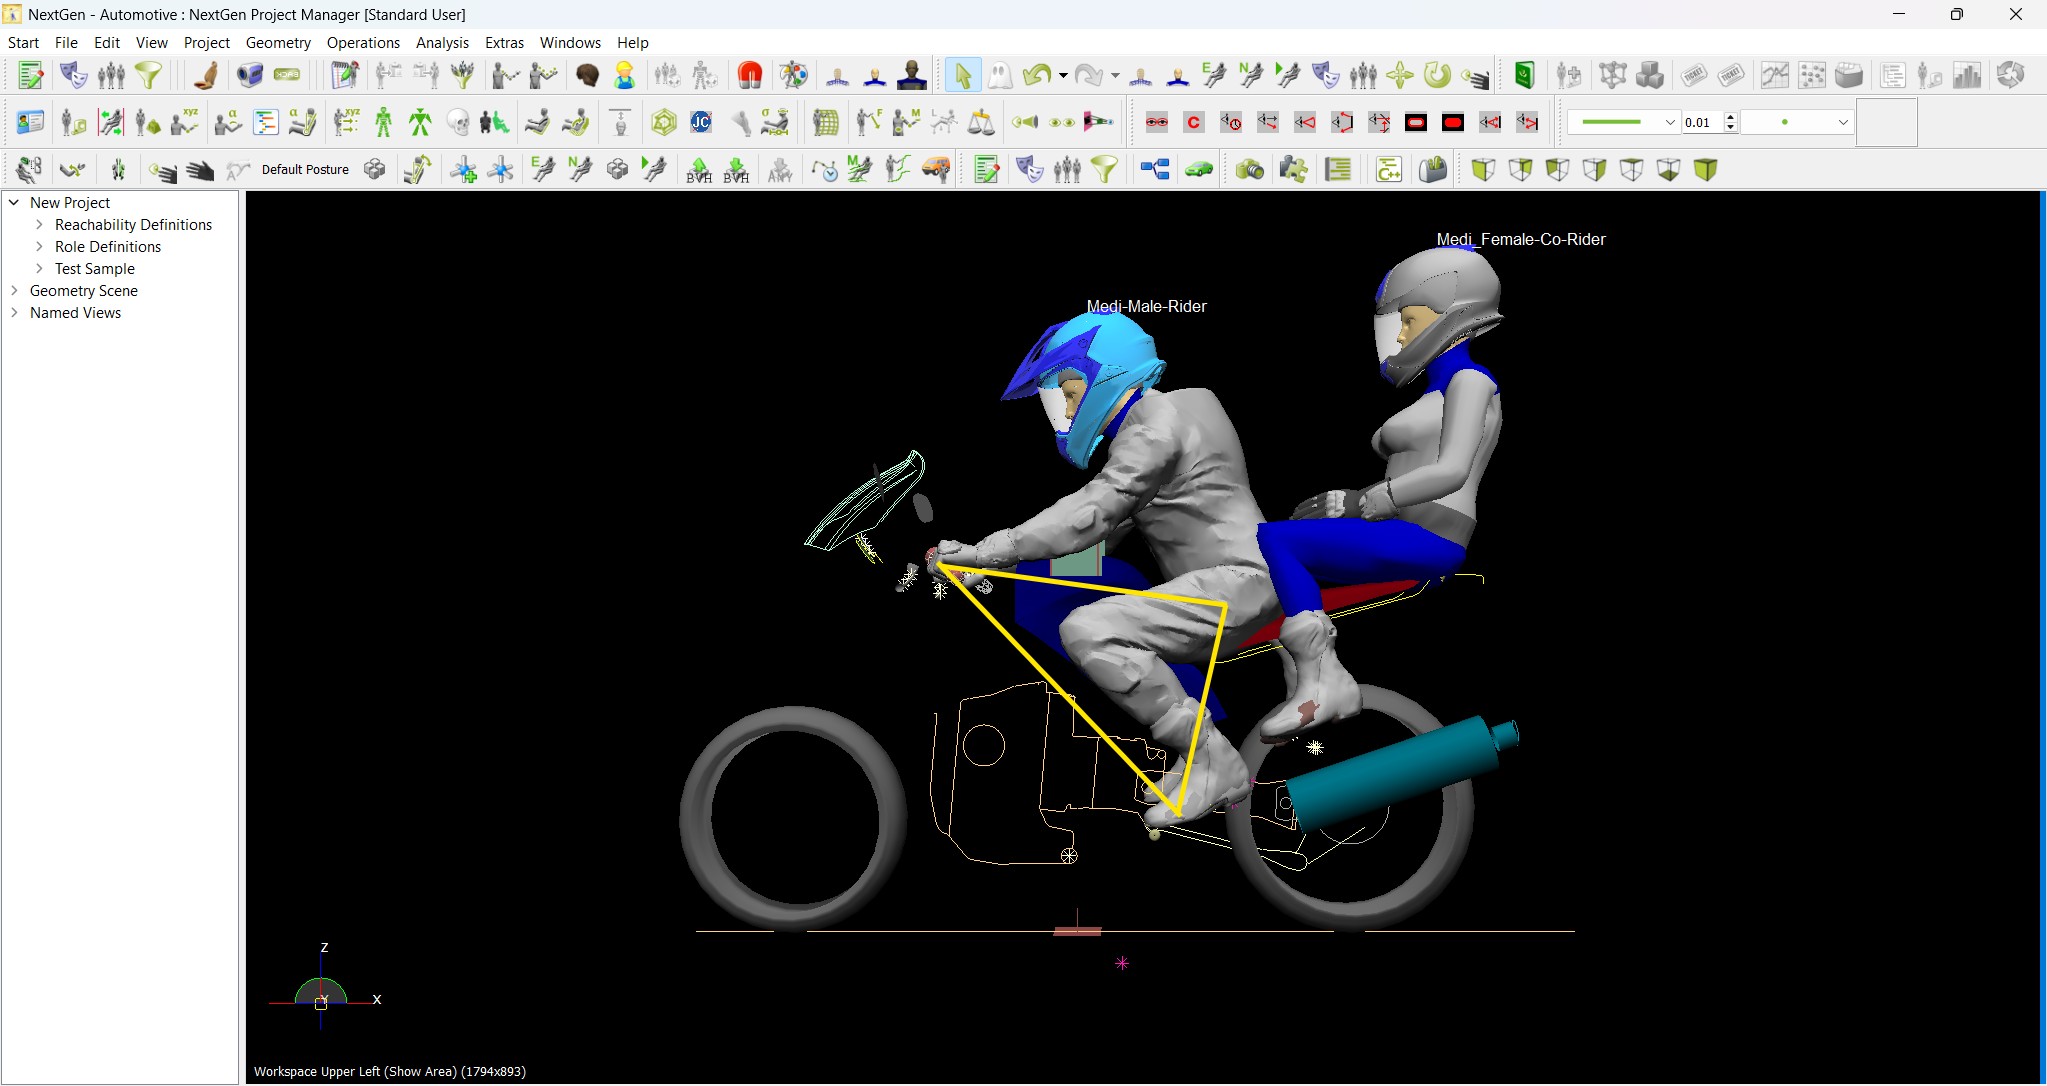
Redefining the Riding Experience with RAMSIS
In two‑wheeler design, comfort and safety start with the rider. RAMSIS (Realistic Anthropometric Mathematical System of Interior Comfort Simulation) is an ergonomic simulation platform that…
-

Enhancing Product Understanding through 3D Technical Illustrator
The 3D Technical Illustrator role within the 3DEXPERIENCE Platform enables organizations to transform complex engineering data into clear, interactive, and visually rich technical documentation. In…
-
Transforming Physical Parts into Digital Models with CATIA 3DEXPERIENCE Reverse Engineer role
Reverse engineering has become a critical capability in modern product development, especially when working with legacy components, competitor benchmarking, or physical prototypes that lack digital…
-
Fixing Search Service Down Issue in 3DEXPERIENCE Platform
Search is one of the most critical features in the 3DEXPERIENCE platform. If the search service goes down, users cannot find objects, documents, or data—impacting…
-
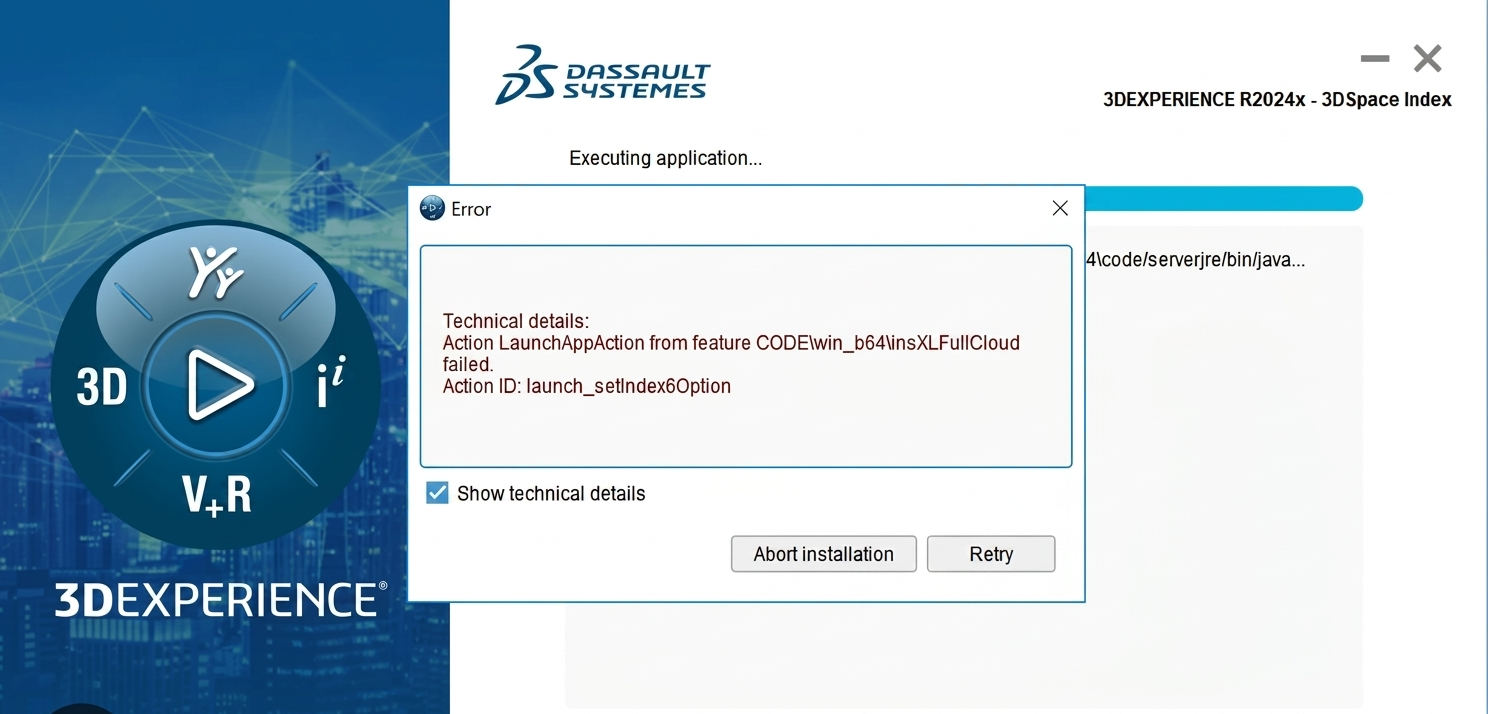
Common Installation Errors and How to Fix Them in 3DEXPERIENCE
The 3DEXPERIENCE Platform is a powerful solution used by industries worldwide for product lifecycle management (PLM), simulation, and collaboration. However, installing 3DEXPERIENCE—especially on-premise—can be complex…
-

From Classroom to Industry: Empowering Future Engineers with the 3DEXPERIENCE Platform
In today’s fast-evolving engineering and design landscape, educational institutions must go beyond conventional CAD teaching methods. While standalone tools like CATIA V5, SOLIDWORKS, or traditional…
-
CATIA Composer – Transforming Engineering Data into Interactive Technical Documentation
CATIA Composer is a powerful desktop application from Dassault Systemes designed to transform engineering 3D CAD data into highly intuitive and interactive technical documentation. In…
- Swapnil Deshmukh
- September 30, 2020
Common CATIA V5 Shortcuts & Customization
For any CAD software, Model manipulation options are very important to improve the productivity & for ease of use. This article will introduce you to all these options below.
Model Manipulation with Mouse
| Function | Options using your Mouse |
| Pan | Hold Middle Mouse B |
| Zoom | Hold Middle Mouse B + Click Right B or
Hold Middle Mouse B + Click Left B |
| Rotate | Hold Middle Mouse B + Hold Right B or
Hold Middle Mouse B + Hold Left B |
Model Manipulation with Keyboard
| Function | Option using your Keyboard |
| Pan | CTRL + RIGHT Arrow Key: Move the model to the right
CTRL + LEFT Arrow Key: Move the model to the Left CTRL + TOP Arrow Key: Move the model to the Top CTRL + BOTTOM Arrow Key: Move the model to the Bottom |
| Zoom | CTRL + PAGE UP: ZOOM IN the model
CTRL + PAGE DOWN: ZOOM OUT the model |
| Rotate | SHIFT + LEFT Arrow Key: rotate to the left
SHIFT + RIGHT Arrow Key: rotate to the right SHIFT + UP Arrow Key: rotate upward SHIFT + DOWN Arrow Key: rotate downward |
Listed below are the CATIA V5 shortcut keys that users need to know.
Esc: Abort the current process or exit the current dialog box (when there is one)
- F1: Get CATIA V5 assistance by launching the contextual help documentation
- F3: Toggle specification tree display on and off
- SHIFT – F1: Context assistance (Get help on toolbar icons)
- SHIFT – F2: Toggle the specification tree overview on and off – opens an overview on specifications tree in a new window.
- SHIFT – F3: Structure tree activate around e.g. character size to modify (activate the graph if the model is active and inversely)
- ALT + F8: Macros start
- ALT + F11: Visual basic editor
- CTRL + SHIFT + Right arrow: ROTATE the model Clockwise
- CTRL + SHIFT + LEFT arrow: ROTATE the model Anti Clockwise
- CTRL + Tab: switch between the different windows (swap active document windows)
- CTRL + N: New document open
- CTRL + O: Document open
- CTRL + S: Document save
- CTRL + P: Document print
- CTRL + F: Search
- CTRL + U: Update
- CTRL + X: Cut out
- CTRL + V: Insert
- CTRL + Y: Redo
- CTRL + Z: Undo
- CTRL + G: Selection Sets
- ALT + Enter: Properties
Did you know that you can improve your CATIA speed and efficiency by using both hands? One hand can work the mouse while the other can use keyboard shortcuts.
Customize the Commands
You can also create your own shortcuts for the frequently required commands by customizing them.
Tools>Customize
Select the Command Tab. Select the appropriate Categories and select the command (Hide/Show) which you want to create short key.
Click Show Properties button. Type the key which you want to use as shortcut key. In this example space bar key is used in the Accelerator field.
Now whenever you will press Space Bar key it will allow you to Hide/Show the selected elements.
Power input mode
The power input box is located in the bottom right corner of the status bar:
Power input mode is a user-friendly productivity assistant allowing you to:
- Enter numeric data more easily in editable fields and spinners (but cannot be used in combo lists); as such, it is intended as an alternative to typing values in dialog boxes (dialog boxes are however still available).
- Enter commands directly (by typing the c: followed by the name of the command).
- Entering selection queries using the query language available when using Edit > Search.
Power input is available in certain (but not all) application commands. Note also that prefixes used to run commands or selection queries vary according to the language.
To activate power input mode, select Tools > Options, click the General tab, and click the P2 option, then restart your session.
Activate Action Pad
This task explains how to set up pad options in order to perform viewing operations using the Tablet Pen on a Tablet PC. Note that you can use the pad to visualize both 2D and 3D objects
Tools>Options>General>Devices & Virtual Reality
If this option is selected, it means that the pad display is activated in the geometry area. By default, the pad is displayed to the right.